Print Preview
The Print Preview window shows the actual image that will be sent for printing on a specific member or stack of members according to the settings defined in the Printer Setup window and Plate Marking Control Panel.
 Access
To open the Print Preview window for a member, do the following:
- Right-click the desired member in the Member List or Optimised tab.
- Select Preview Image... from the context menu.
Note: The Print Preview window for a stack of members can only be opened from the Optimised tab. Make sure to always select the member listed first in the stack (not the one displayed in light grey).
 Printable areas

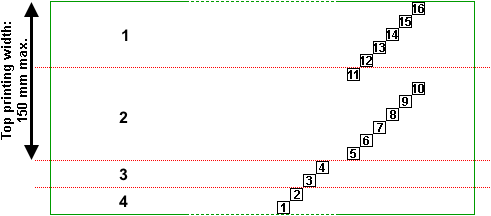
Note: the diagram above is based on a 90‑mm-wide material.
The green rectangle delimits the entire printable area.
The numbered squares indicate where each print head prints on the timber (for more details about the print heads, see Print modules).
The red dotted lines delimit the following areas:
- Top side of the horizontally stacked member that is away from the fenceline
- Top side of a non-stacked member, or top side of the top-stacked member
- Edge of the top-stacked member
- Edge of a non-stacked member, or edge of the bottom-stacked member
 Controls
|
|
Toggle this button on then click the image to zoom in on the clicked location. |
|
|
|
Toggle this button on then click the image to zoom out from the clicked location. |
|
|
|
Click to fit the image to the window. |
|
|
|
↑ ← ↓ → |
Use the arrow keys to move the image around. |

 or
or 
 or
or 

 or
or